My Mantel is Finally in Full Spring

March 29, 2012

Spring mantels have been popping up all over the place in the last month.  So bright.  So cheery.  So fresh.

I love them.

Despite seeing all of the creative displays I wasn't feeling motivated to transform my drab mantel.

And then it happened.  

Sunshine.

It is amazing what a little peek at the big, bright guy can do to a person.  I was suddenly inspired and moving full spring ahead!

I got rid of the deep, chocolatey brown wall above my mantel, painting it a less "light sucking" color, Simply Beige by Sherwin Williams {same color as the rest of the living room walls}.


Oh the things a girl can accomplish when the little one is napping...


I haven't gotten around to painting the brick and mantel, they are still the yucky, dated brown color.  Thanks to the magic of photo editing I was able to take a peek at what a little white paint might do... I am in love.  I can hear the fireplace whispering "paint me" from every corner of the house.

I love my refreshingly simple Spring mantel.


The gorgeous bouquet was inspired by Little Birdie Secrets.  The flowers are made using coffee filters!  Beautiful.  Want to make some yourself?  Check out the quick, easy tutorial {HERE}.  I did not have floral wire or tape.  I used some wire out of the closet.  You can't see the sticks in this vase anyway, so no biggie.

I made the "Spring." bunting from paper doilies I found at Dollar Tree and letters cut from scrapbook paper on my Silhouette.

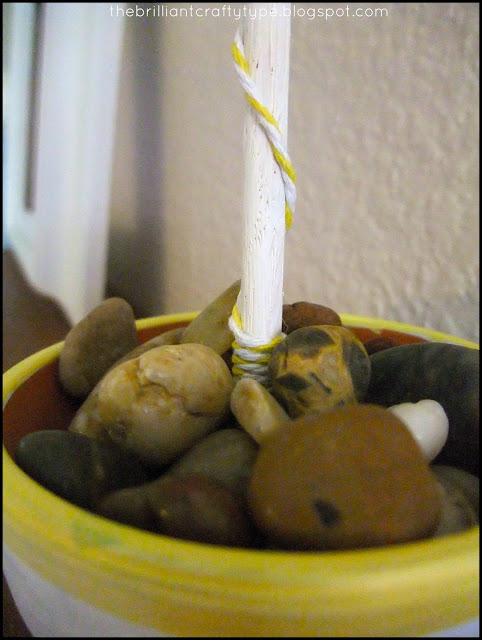
I ran a piece of twine through the doilies and tied them to two dowels I found in the closet.  To pretty up the dowels I gave them a quick coat of white paint and then wrapped them in yellow and white twine from The Twinery.

To keep with my yellow, white and blue theme I snatched up two baby blue buttons and attached the bunting to the dowels with those to cover up the knot.

To hold the dowels I dug out two small terra cotta pots and painted them white, yellow and blue.  I wasn't worried about terra cotta showing through so I just did one coat.  To keep the dowels in place I stuck a little square of floral foam in the bottom, jabbed the dowel in it and then filled the pot with river rocks to keep them from shifting.


The frame was a Goodwill find from long ago that I spray painted white.  The simple, elegant vase was a fellow Goodwill pickup.  I love Goodwill!

Lastly, the bunny was cut from scrapbook paper on the ol' Silhouette that I hung on the frame's wire using a mini clothespin.

Ta-da!


How pumped was I that I didn't have to run out to buy a single thing to do this??


Linking up to these fabulous parties:
Visit thecsiproject.com
Sunday: Homemaker on a DimeDIY Show Off

**My entry into Strut Your Stuff sponsored by Appliances Online and the Bosch Washing Machines

I remember when Friday used to mean the work week was over...

March 23, 2012

You know you need a break when ...

... you catch yourself giving your 18 month old the stink eye when her back is turned.

... you bribe your 5 year old with a late night movie if she rubs your feet.

... you stop thinking "STOP TALKING!" as you listen to your chatty husband go on and on about something which is LITERALLY a waste of time {even he knew it was dumb} and you actually tell him to shut it.

... you tell your husband to go to the match without you and the kids and {for once} he does precisely as you say and you find yourself imagining the soccer ball flying into the stands and hitting him square in the face.

... you throw together a hod podge dinner for your children and completely forget to feed yourself {until it is so late and you are so tired that starving is a risk you are willing to take}.

... you get in bed, realize you forgot to brush your teeth, take a deep breath and say "forget it."

... you look to the heavens and pray that you'll make it to 1 o'clock tomorrow when you can drop your kids off at your aunt's house and walk away for 24 hours.

**deep breath**

Ladies, I need a break.

Book Page Wreath {Pages o' Potter}

March 21, 2012


I mentioned in my Potter canvas post {HERE}, a pretty little girl I know is having a birthday soon...

I like to make a big deal out of my sweet little girls' birthdays {I think they enjoy it... but it might be mostly me.}.  I start the planning process a few months before the big event and usually need at least a month to handle all the preparations.  The parties are always themed, the invitations are always handmade and the decor is always awesome.

Maia's birthday themes {1-5}:  Butterfly, Train, Tinkerbell Carnival, Bubbles, Gardening

Ella's birthday themes {1}:  Teddy Bear Picnic

I can safely say, this party is going to be my best yet.

Earlier this month I started the snitch rolling with my girly version of Harry Potter canvas art.  This week the snitch is taking flight with my absolutely fabulous Pages O' Potter Wreath!


Isn't he a doll?


The best part about my wreath?  The little trinkets I made to embellish it!

These were so fun to make and I think will receive the most "oohs" and "aahs" for sure.

Owl:  Charm found at Michaels.

Broom:  I cut a paintbrush down slightly, sanded it, painted the handle and hairsprayed the brush portion so it was more spread out.  I hand painted "Nimbus 2000" on the end.


Wand:  I sanded and painted the tip of the paintbrush that I had cut for the broom.

Snitch:  I found a random, wooden knob in the craft closet and painted it gold.  I cut the wings out using my Silhouette.


Potion Bottles:  I bought the Tim Holtz 9 vial set at Joann's on sale.  I chose the smallest vials and filled them with water that I then tinted with food coloring {blue and red}.


Dragon:  I bought the charm at Michaels and then hand painted it.

Pegasus:  Another cute charm found at Michaels and then hand painted.

Frog:  And again, a charm I found at Michaels and then hand painted for the "chocolate" look.

Key:  An embellishment that came off of a wedding gift card I had saved.

Glasses:  I drew and cut these on my Silhouette.  I cut out scraps of book pages to fill the glasses.
Scar:  I drew and cut this out using my Silhouette.


I attached each of these sweet little things with wire, string or glue {whatever worked best for each item}.


This year's theme was a no brainer because my Maia is a Harry Potter fanatic.  My husband recently started reading the books to her and they are loving it {they are on the 3rd book now}!  She has all the movies and asks to watch them every chance she gets {there was a short period of time that she was forbidden because of some Serious Black induced fear of the dark}.  

I started gathering ideas for this b-day bash after last year's party {was that too soon?}.  I have pages of notes in my brainstorming notebook {gotta have paper and pen handy at all times!} and a Harry Potter Party Pinterest board.

Be prepared to see a whole lotta Potta over the next month.

From here until the end of April I will be sharing at least one Harry Potter inspired craft with all of you each week!  It will all come together on April 30th when I unveil Maia's Harry Potter Party Masterpiece!

I started this project after I heard about the wreath theme for March in the {new} Pinspired & Rewired Challenge put on by fellow brilliant bloggers Gingersnap Crafts, Southern Lovely, The Gunny Sack and Family Ever After.  Have you met these ladies yet?


There will no doubt be some serious competition in this series!  Hopefully my wreath can handle the pressure!

Since the challenge is based on Pinterest inspiration, I scoured Pinterest for a wreath that I could tweak to fit with a Harry Potter birthday party.

To my excitement I found this papery perfection.

{source}
You can check out this pin and my other Potter pins HERE.

The blog where this originates, D Reyne, has a tutorial, but I didn't consult her steps until long after my wreath was complete.  I simply took the inspiration and went with it!  Now that I have read through her tutorial I can see that my path was different.

Since D Reyne has a lovely tutorial I will not post my creation process step-by-step, but I will share a few tips!

My materials:

About 100 Harry Potter book pages from Order of the Phoenix {torn on the left and right side of page}
Stick wreath form from the dollar store {looks to be about 16"}
Strips of linen in a shade close to the book pages
My First Ticonderoga pencil
Embroidery floss in Hogwarts' school colors
Scotch tape
Hot glue & glue gun
Scissors

1.  Use a My First Ticonderoga pencil to roll your book page scrolls {these are designed for Pre-K & K students so they are bigger around than a standard pencil}; unless, of course, you want a tighter scroll.

2.  To keep each scroll closed use a small piece of scotch tape.

3.  Tie scrolls together in bundles of twos and threes and some singles too for a really nice variety and good depth.

4.  Wrap your wreath in a fabric that coordinates with your book pages.  I used linen.  There are bound to be a few gaps here and there where bits of wreath would show if you don't cover it.

5.  Use hot glue to attach the bundles to the wreath.  Even just tying the scrolls into bundles became tiresome and frustrating at times {my least favorite part}.  I can't imagine then also having to tie them to the wreath form.

6.  Glue the bundles to the wreath over a period of a few days.  Put some on and then turn it so you can see a different angle for the next time you add some.  I found this to make it more even and not so monotonous.


I really want to display this on some distressed shutters above the mantel, but I have yet to score any shutters {ARGH!}.  For now he stands alone, patiently waiting.


21 Days From Now I Will Be A Morning Person {God, I Hate Morning People}

March 19, 2012

I am not a morning person.  I have never been a morning person.  

My genetic code has predestined me to be the type of girl who hits snooze at least three times every morning and then just shuts off the alarm altogether.  

I have no choice but to finally drag myself out of bed each morning after a 45 minute battle between what my brain knows should happen and what my body believes to be necessary.

My body has this stupid idea that staying in bed is allowing it more rest and therefore it will feel more refreshed, revitalized and productive when it finally does rise.  My body is wrong.

Each morning in this house is stressful.

If I stay in bed until 7:30 that means Maia isn't up either.  Maia is a slow roller in the morning.  She needs a lot of time to accept the fact that she actually does have to get up and go through her skin care routine {Dear Psoriasis - YOU SUCK!}, brush her teeth, put on her uniform, eat breakfast while letting mommy wet her hair, comb it, put products in it and finally style it {Dear Naturally Curly Hair, While you are gorgeous when done, you are a real pain to do!}.

We need at least 30 minutes for all of the "getting ready" business and at least 15 minutes for eating a bowl of cereal {slowest eater this side of the Mississippi}.  You must also factor in a "slow moving vehicle" cushion.  Since Maia drags her feet from the second they hit the floor it takes her extra time to get from point A to B and then C and D and E... etc.  Realistically we need at least 5 extra minutes for "transportation."

50 minutes is what we would need for Maia from eyes open to walking out the door at 8:10 {we never get out the door by 8:10 so she is frequently sliding through the classroom door right before the bell or she is late}.  

Now that 50 minutes is if it was just Maia.  Little Ella is of course interfering with this entire process.

The Ella Factor:
Getting into the bathroom garbage - 10 second delay
Throwing her eggs on the floor - 15 second delay
Escaping the baby gate and running down the hall - 30 second delay
Climbing onto a dining chair and falling off - 1 minute delay
Poopy diaper - 2 minute delay

You get my point...

If we weren't so rushed in the morning it wouldn't be a big deal for me to stop for 5 minutes to hang out with Ella and if she had a little more attention she probably wouldn't be getting into so much trouble.

To allow for a smooth flowing morning wherein we are all more at ease and therefore more productive we need at least an hour.  Maia needs to be up between 7 and 7:10.

I dislike waking up and immediately being put on mom duty.  It is not a warm, happy way to rise and is probably part of the reason I stay in bed as long as I can.

Wouldn't it be just dreamy if I could wake up, have my chai, work on a project or brainstorm some new ideas all before anyone else is around?

Um, yes.

An hour each morning to myself.  An hour of Jennifer time, not mommy time.  No cleaning and no computer allowed during Jennifer time.

But you know what this means?  In order to have an hour of Jennifer time I will have to get up at 6.  I do not get up at 6.

Right now my alarm goes off at 6:30 and I never get out of bed before 7.  This morning I got out of bed at 7:30.  I'm not sure why I even set the alarm at all...

There is no way around it anymore.  This has to be done.  If I am going to make it in this torturous world of stay-at-home motherhood I am going to have to do what I thought could never be done.  If I am going to make it through this alive, and actually smiling about it, I am going to have to defy science and alter my genetic code.  If I am going to live the dream I am going to have to become a morning person.

Here is my strategy:

1.  Picture it.  Write it.  Draw it.  Say it.  Dream it.

2.  Do the dishes and straighten up the living room, dining room and bathroom before I go to bed each night {Mess will distract me in the morning and I will inevitably be drawn to it}.

3.  For the first week set my alarm for 6:30 and put my phone on the dresser, not my bedside table.  If I have to get up to shut it off I will probably stay up.

4.  For the second week set my alarm for 6:15.  Phone still on the dresser, not by the bed.

5.  For the third week set my alarm for 6:00.  Phone still on the dresser, not by the bed.

By April 10 I will have officially developed a new habit and I suspect I will be more productive, more relaxed and happy about it!

I know I am not the only person who despises morning people, but secretly wishes to be one.  Try this out with me!

Embroidery Hoop Name Art {In Less Than 60 Minutes}

March 12, 2012

I have been wanting to take a stab at needlepoint for the longest time and what better day than today?

During Ella's afternoon nap I sat down with some bright, happy about life, bring on the sunshine, raspberry fabric, a natural wood embroidery hoop, yellow cheer and baby's breath white embroidery floss and just did it {it always helps when you just happen to have everything you need lying around - lucky me!}.

It took me less than an hour to create this melt my heart piece of art for my tiniest Ella Irene.


Each detail is hand embroidered with my own freehand design.  No stencils.  No tracing.  Just creating as my crafty fingers saw fit.  


I love the contrast between the two writing styles.  I feel like the combination places the perfect emphasis on each part of my girl's precious tiny little name.


This would make an amazing gift for pretty much any occasion.  So thrilled to add this to my bag of tricks for the next baby shower or birthday!

My Maia Rachelle has already put in a request for one of her own.

I think I like this needlepoint business!

This simple elegant piece of awesome made the top 10 in the CSI Project challenge this week!
Look at all the places she's been featured!  Be still my heart!


Photobucket


Imprintalish
The ArtsyGirl Connection


Photobucket

Positively Splendid
">


A girl and a glue gun

This project has been entered at:


Entering this tantalizing challenge:
Visit thecsiproject.com

Liebster Blog Award

March 10, 2012


Last month I was the proud recipient of the Liebster Blog Award!  Kimberly over at Simply Living found my little blog inspiring enough to give it the thumbs up {THANK YOU!}.  Simply Living is a great spot to check out, if you haven't already.  In fact, I would give HER the Liebster Blog Award, but I  feel like it might be an unwritten rule NOT to give it back... {hmmm...}

What is The Liebster Blog Award?

The Award is given by a Liebster Award recipient to other "small" blogs that they find interesting/inspiring.  How cool right?

It is so nice to know that someone is paying attention and appreciates your content!  As a blogger who is still far from "the big time" it means a lot to be acknowledged!

The rules are:
1. Thank your Liebster Blog Award presenter on your blog;
2. Link back to the blogger who presented the award to you;
3. Copy and paste the blog award on your blog;
4. Present the Liebster Blog Award to 5 blogs of 200 followers or less who you feel deserve to be noticed; and,
5. Let them know they have been chosen by leaving a comment at their blog.

Sorry for the delay in doing this!

The five "little guy" {by Liebster standards} blogs that I feel most inspired by arrrrrre:

{in no particular order}


Life on the Bay Bush

Destination: Craft

Tales of a Domestic Mama

Congratulations ladies!  You inspire me {and so many others}!


PicMonkey is Here!

March 9, 2012

You probably heard the buzz awhile back about a new photo editing site in the works.

PicMonkey is up and running and I love it!

I spent a few minutes tweaking a few photos to give it a test.


I would like to see more font options, but other than that I am in love.

Looks to have all of the awesomeness of Picnik {with a few things still in progress like collages, etc.} plus it has the whole cute monkey thing going on.

Here is the other photo I played with {a sneak peek at next week's Potter post}:


Related Posts Plugin for WordPress, Blogger...